![]()
![]()
![]() Vår video fick silver i årets FACEnetwork (Farmhouse and Artisan Cheese & Dairy Producers European Network) videotävling!!
Vår video fick silver i årets FACEnetwork (Farmhouse and Artisan Cheese & Dairy Producers European Network) videotävling!! ![]() Årets tema var bland annat att lyfta bra idéer och smarta lösningar. Som klippt och skuret för oss tänkte vi och började filma snuttar från vår vardag för att få ihop till en liten film om hur vi använder teknik för att driva en hållbar verksamhet. Ni får jättegärna gå in och kika på resultatet!
Årets tema var bland annat att lyfta bra idéer och smarta lösningar. Som klippt och skuret för oss tänkte vi och började filma snuttar från vår vardag för att få ihop till en liten film om hur vi använder teknik för att driva en hållbar verksamhet. Ni får jättegärna gå in och kika på resultatet! ![]()
Varför naturbete och vikten av lokal mat
Biosfärområde Blekinge Arkipelag arbetar med hållbara lösningar på globala utamningar. Här kan ni läsa våra svar på deras frågor, som till exempel varför naturbete är så viktigt och våra tankar kring vikten av inhemsk och regional livsmedelsproduktion:
”1. Namn, yrken, boplats?
Claire & Nils Sjöström, Getbönder och gårdsmejerister. Claire jobbar dessutom som HRIT-specialist och Nils som IT-säkerhetsspecialist, Slänsmåla, nordvästra Blekinge
2. Hur många djur har ni idag och var betar de?
Vi har 40 mjölkgetter och 12 rekryter till mjölkbesättningen. De betar gårdsnära på naturbetesängar, åkervall, våtmark och i skog. 30 bockar/bockkillingar varav 15 betar på gården och resterande deltar i olika naturvårdsprojekt i skärgården och skogsbygden.
3. Varför naturbete och varför är det viktigt?
När betesmarker växer igen minskar den biologiska mångfalden, och många av de arter som etablerats sedan istiden trängs bort. Landskapet blir tättbevuxet och monotont, och de artrika biotoperna nära marken skuggas, försuras och utarmas. Naturbete med getter motverkar effektivt igenväxningen genom att buskvegetation och barrträd decimeras, samtidigt som den marknära växtligheten tillförs näring och ljus. Mullagret som bildas av ökad biologisk aktivitet binder koldioxid och ger bra förutsättningar för insekter och svampar.
Getter tar sig fram överallt, och ser till att även områden som är stenrika, vattensjuka eller allmänt svårtillgängliga kommer i bruk. Då de är lätta djur packar de inte marken, och trampar inte upp känsliga jordar under blöta perioder. Detta är optimalt för växter som behöver klövens hjälp för att få ner sina frön i jorden, samtidigt som geten kan beta ute under en längre tid av året än stora betesdjur. Getter på naturbete är det enda lantbruksdjuret som kan omvandla cellulosa till högkvalitativa livsmedel, och eftersom markerna de betar oftast inte lämpar sig för mekaniserad växtodling, foderproduktion eller skogsbruk konkurrerar de inte om odlingsarealer med annan livsmedelsproduktion.
4. Idag pratas det mycket om vikten av inhemsk och regional livsmedelsproduktion, hur ser ni på er roll i detta?
Många direkta aspekter av lokal livsmedelsproduktion belyses av naturbetets positiva effekter för närmiljön. Ekologiskt motståndskraftiga marker som är tillgängliga, fertila, brandsäkra och inbjudande utgör en beredskapsresurs som i svåra tider snabbt kan ställas om till ökad eller ändrad livsmedelsproduktion. Även om storskaligt producerad importerad mat tidvis är billigt, visar den senaste tidens prövningar i samhället, från pandemi till invasionskrig, hur leveranskedjor och distributionslösningar lätt kan slås ut och leda till bristsituationer och inflation. Med ett stort utbud av lokalproducerade livsmedel minskar behovet av energikrävande transporter och lagringslösningar samt svinn i distributionsledet. Med ökad lokal förädlingsgrad följer en stark lokal ekonomi, då arbetet med att addera värde till råvaran skapar arbetstillfällen lokalt. Den digitala utvecklingen stödjer samtidigt småskalig och decentraliserad produktion och förädling, då prisutvecklingen på utrustning de senaste decennierna gjort att en stor fabrik inte nödvändigtvis är den mest rationella enheten idag. Med småskalig, decentraliserad livsmedelsproduktion kommer även möjligheten att ta till vara lokala kvalitetsaspekter som annars suddas ut då råvaror går in i storskalig produktion. Terroir, den unika smaken som jordmånen delar med sig av, årstidsvariationer, mångfald inom djurraser och växtsorter, livsmedelsproducentens erfarenhet och kreativitet. Egenskaper som leder till hög kvalitet och ett unikt, omväxlande och inspirerande livsmedel.
5. Hur ser ni på framtiden och era möjligheter?
Lokalproducerade livsmedel framtagna utifrån småskaliga principer kommer alltid att ha en stark efterfrågan i grupper intresserade av mat, livsnjutning och hälsa och prioriterar tid och resurser på att hitta det bästa.
När det gäller att nå en bredare målgrupp uppstår begränsningar inom framförallt distribution som gör att både pris och tidsåtgång för den enskilde konsumenten blir högt, trots att både den totala transportsträckan och lagringstiden är kort för den lokalproducerade produkten. Inom konceptet REKO-ring finns indikationer på ett stort intresse men tillgängligheten ur ett tidsperspektiv för konsumenter är begränsade, samtidigt som bristen på samordnad lagrings- och transportkapacitet bland producenterna driver utgifter som gör att producenter avstår från att leverera, eller måste hålla priserna uppe.
Samma problem gäller för hotell, restauranter och mindre butiker, som gärna profilerar sig genom att erbjuda lokala produkter. Tidsåtgången som krävs för att hantera ett flertal leverantörer administrativt upplevs som begränsande, och kostnaderna för enskilda transporter blir höga.
Våra förhoppningar är att projektet Jordmån Blekinge kan adressera dessa problemställningar, och bilda den organisation som behövs för att knyta samman utbud och efterfrågan. Så att våra unika livsmedel från Blekinge kan nå sin fulla potential utan att behöva åka härifrån.”
Texten är publicerad 2023/09/28. Orginalkällan hittar ni på Biosfärområde Blekinge Arkipelags Facebook.

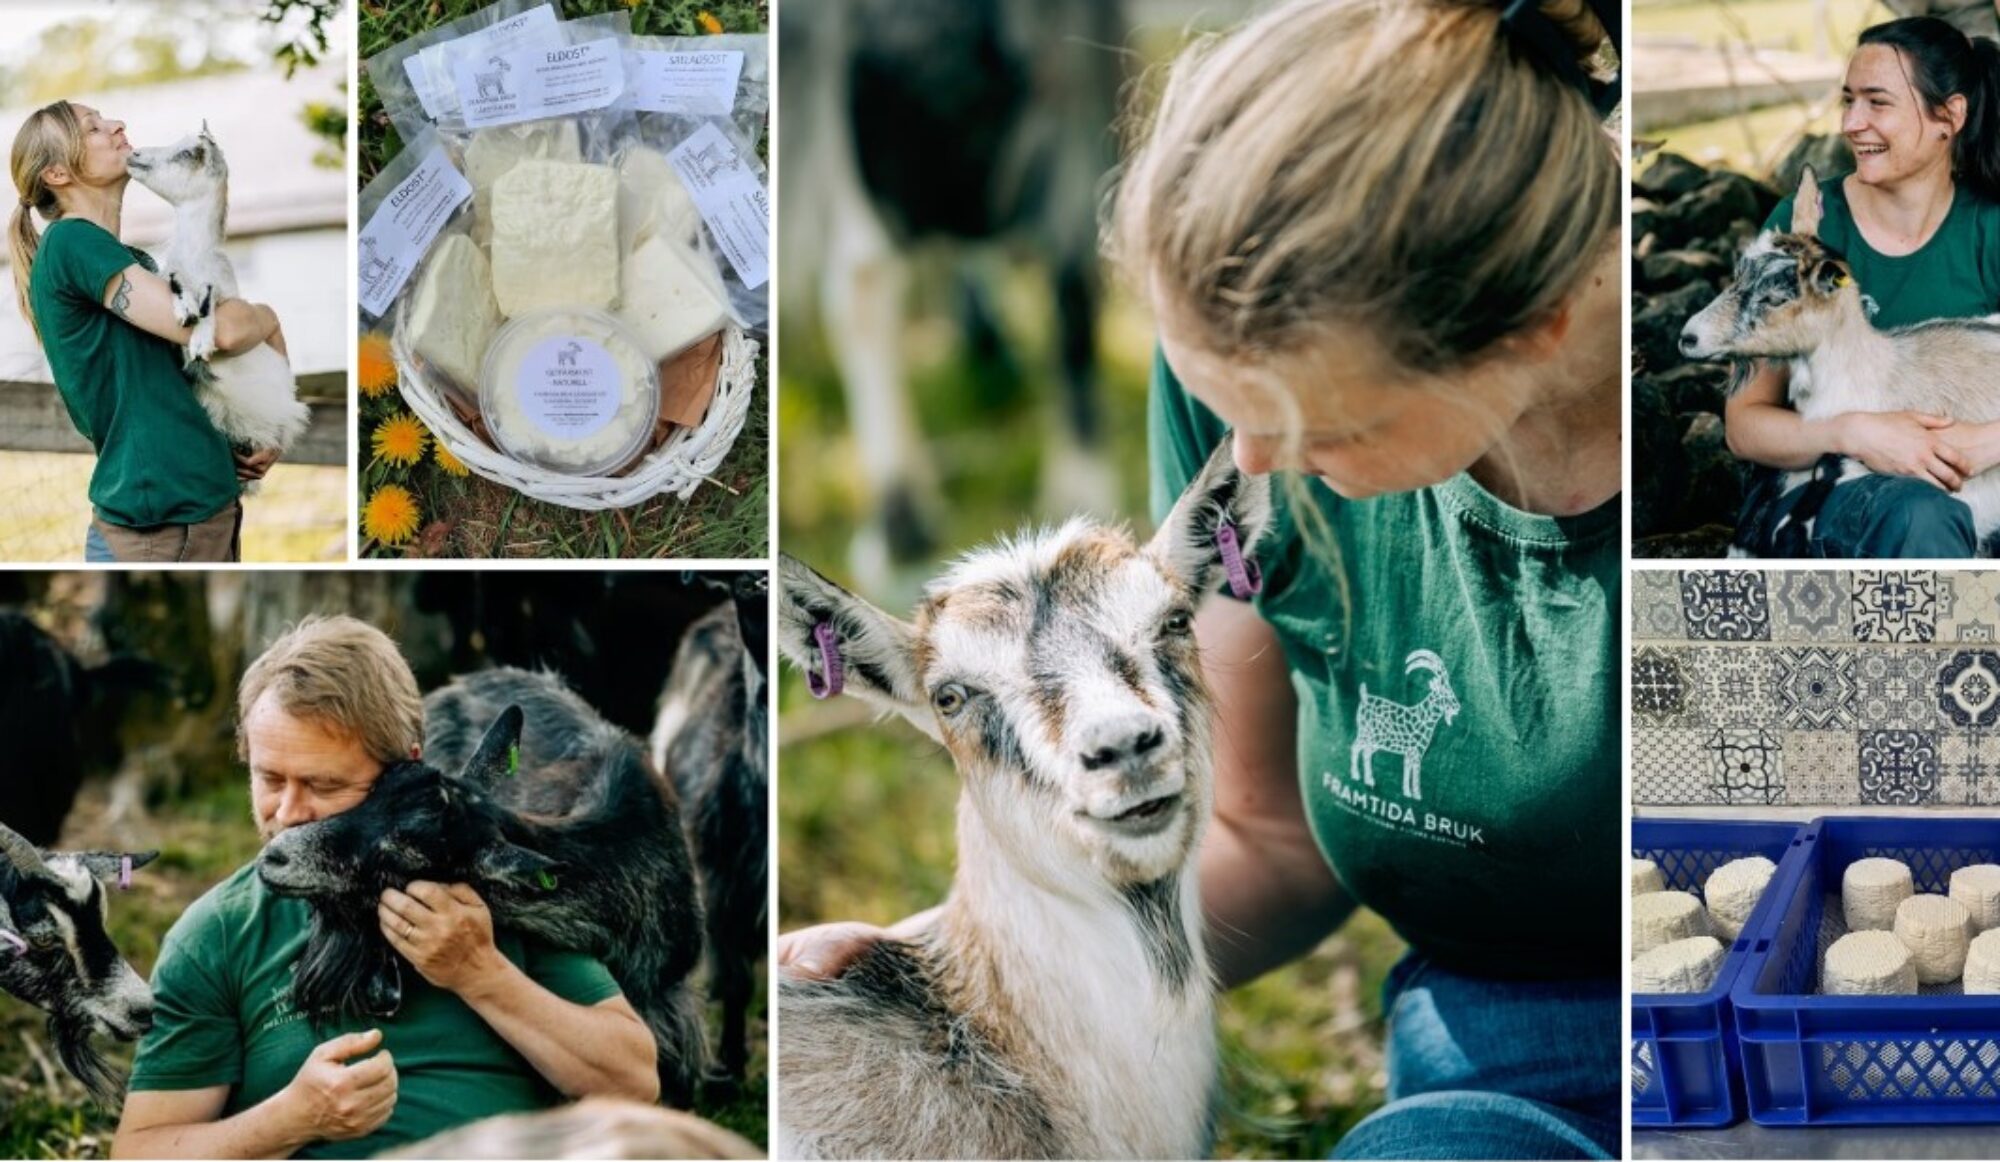
Varför getter?

”Varför valde ni just getter?” undrar folk ibland. Svaret ser ni på bilden! 😍🐐💓🙌🥰 Och förutom att de får våra hjärtan att sprängas av kärlek regelbundet så är getost ett fantastiskt sätt att koncentrera näring från skogar och hagar till ett högvärdigt proteinlivsmedel med minimal klimatpåverkan. I getens mjölk återfinns 140% av de aminosyror som människan behöver, och kan därför som enskilt livsmedel täcka hela vårt proteinbehov.
Getter utmärker sig som idisslare just för att de äter ett så brett utbud och kan bryta ned och tillgodogöra sig näring från både stärkelse i gräs och löv och cellulosa i bark, pinnar och ved. Det gör också att de är fantastiska naturvårdare som öppnar upp igenväxta och svårtillgängliga marker, vilket främjar den biologiska mångfalden när solen kan nå ner igen till växtarter som annars inte har en chans av skrymmande växter. Allt det här gör de medans de är så förbaskat söta, fantastiskt!
Kurs om getter och getost
NYTT KURSTILLFÄLLE 21-22 OKTOBER ![]()
![]() För dig som funderar på att skaffa mjölkgetter, är nybliven ägare eller bara älskar getter och ost och vill lära dig mer!
För dig som funderar på att skaffa mjölkgetter, är nybliven ägare eller bara älskar getter och ost och vill lära dig mer!
GETHÅLLNING & OSTYSTNINGSTEORI, 21-22 OKT 2023, SLÄNSMÅLA, BLEKINGE
Dag 1 börjar på gården där du får lära känna våra getter och killingar. Vi går igenom grundläggande gethållning som stängsel & naturvård, vanliga sjukdomar, klövvård och killning. (Vi har avsatt extra tid på förmiddagen för just getmys så att du verkligen får chans att umgås med dom ordentligt!)
Dag 2 är mjölken och osten i fokus. Vi börjar dagen med att mjölka våra getter och en visning av vårt mejeri som vi byggt själva. Du får lära dig om getmjölk, getost och grunderna i hur man förädlar mjölk till ost. Dagen avslutas med ostprovning av några av våra ostar.
Anmälan görs hos Studieförbundet Vuxenskolan, SV.SE : https://www.sv.se/avdelningar/sv-blekinge/kurser/getter—djurhallning-och-ostystningsteori-42659/


Getböndernas halvårskonferens
Förra veckan åkte vi iväg och satte oss ner tillsammans för att kolla över hur året går/har gått och för att spåna på idéer framåt. Helt enkelt stämma av med årsplanen vi gjorde i början på året för att se om det är något vi behöver ändra på, som blivit bortglömt eller som verkade som en bra idé men inte funkar i praktiken. Nu under högsäsongen är det högt tempo och dagarna är fyllda med rutiner så eventuella ändringar som kan förenkla eller förbättra processer hinns inte med att tänkas på (och än mindre genomföras) och sen hux flux är året slut. Så en mini-konferens i mitten på året kan vi varmt rekommendera och vi själva kommer definitivt prioritera in det nästa högsäsong också!
På Mellisgård lantcafé (som ligger i Gottåsa utanför Grimslöv) fick vi förutom lugn och ro i vårt konferensrum, också fantastiskt god mat och vi fick klappa både grisar och getter! Ja, att vi lämnat vår egen gård bara 30 minuter tidigare hindrade inte höga uttrop i bilen från alla fyra när vi fick syn på djuren ![]() Efter konferensen fick vi också alla prova på att köra travhäst tillsammans med Sussanne och Captain Crowe. Mäktig känsla!
Efter konferensen fick vi också alla prova på att köra travhäst tillsammans med Sussanne och Captain Crowe. Mäktig känsla!


Säsongsmat, är det så viktigt?
Om vi skulle standardisera vår produktion, för att ostarna ska finnas tillgängliga året om, alltid se likadana ut och alltid smaka på samma sätt, ja då skulle vi bli tvungna att standardisera getterna också.
Getterna äter nämligen efter säsong, det vill säga det som växer i hagen för tillfället. Det de äter ena dagen märks direkt på mjölken nästa dag. På våren när det grönskar som mest kan mjölken få en grönaktig ton och präglas av blommor och örter. Hur häftigt är inte det?!
Det visar så tydligt vilka smakupplevelser man tillåter genom att låta maten vara just naturlig. Om man ska tvinga fram samma produkt när det inte är säsong, ja då får man ta till knep som troligtvis kostar pengar, smak, näring och sliter extra på miljön.
Att getterna kan smaska i sig näst intill allt i hagen, från bark, sly, löv och gräs, och sen omvandla det till mjölk.. Det är ju nästan magi! Standard kan slänga sig i väggen tycker vi.
Det här är delvis varför närproducerad småskalig mat smakar så mycket och är näringsrik. För den är naturlig! Och naturen är smart. Vi kanske inte behöver ha tillgång till all mat, året om? Vi kanske kan lära oss att njuta av det som naturligt frodas just nu, och strunta i att importera paprikor i mars.


Internet of Cheese
Den senaste månaden har vi haft mycket finbesök här på gården! Land Lantbruks reporter kom och hälsade på för att skriva en artikel om vårt bidrag till Teknikutmaningen. Sen kom P4 Blekinge för att ställa lite mer frågor om hur automationerna hjälper oss hålla elkostnaderna nere och till sist fick vi en kamera på plats när SVT Nyheter var nyfikna på samma ämne.
Vi tycker det är så roligt att våra automationer och tekniska lösningar uppmärksammas! Det här är något vi jobbat med redan innan elpriserna började skena men givetvis är det mer aktuellt nu än någonsin. Vår vision är att driva en hållbar verksamhet och eftersom vi har en bakgrund inom IT faller det sig naturligt att det är just tekniska lösningar vi jobbar med för att uppnå det. För er som är nyfikna har vi länkat till några av de medier vi synts i på sistone:


Getmejeriet i Svängsta sänker sina elkostnader – med hemmabyggt it-system
2022-10-22 SVT Nyheter
Getmejeriet kapar elräkningen med hjälp av ”internet of cheese”
2022-10-10 Sveriges Radio p4 Blekinge
Automatik startar osttillverkningen när elpriset är som lägst
2022-09-30 Land Lantbruk Teknikutmaningen 2022
Teknikutmaningen 2022


Automatik startar osttillverkningen när elpriset är som lägst
”För att spara på elkostnaden har Claire och Nils Sjöström byggt ett automatiskt system som startar osttillverkningen på natten när priset på el är som lägst. Allt som behövdes var en dator och några reläer. Nu tävlar de i Teknikutmaningen med sitt bidrag ”Internet of Cheese”. Klicka här för att läsa hela vårt bidrag till Land Lantbruks Teknikutmaningen 2022.
Gladare mejerister med klimatsmart app
Ysta på distans? Ja delvis i alla fall! Kvällen innan ystning aktiverar vi “early bird” som vi kallar det, en automation som under natten startar pastöriseringen så att vi kan utnyttja elen när den är som billigast och tillåter oss att sätta igång med ystningen så fort vi vaknar. Det här är en av många tekniska lösningar vi håller på att utveckla för att effektivisera elförbrukning och arbetstid i mejeriet.
Bland annat har vi en app där vi har översikt över ystningen, som ph och temperatur, och vi kan även styra delar som omröraren och att värma upp eller kyla grytan. Något som kan rädda en hel ystning när man inte bara driver ett mejeri utan också jobbar på distans i sina andra jobb, underhåller en gård och har 40 getter som ruvar på hyss hela dagarna!
Vi ser de här tekniska lösningarna som ett måste för att göra verksamheten lönsam och hållbar, både för miljön och mejeristen. Det är inget som försämrar kvalitén på varken hantverket eller produkten, utan syftet är att ersätta tidskrävande uppgifter där närvaro inte är nödvändig. Vad är era tankar om automationer och IT-lösningar i mejeriet?


Ost gjord på solljus
Vi kommer inte höja våra priser i år! Tack vare solceller, effektiv energiförbrukning och att vi har nästan hela produktionskedjan på gården.
Det fina med ostystning är att det naturligt följer samma kurva som solljuset och därför är det optimalt att driva mejeriet med energi från solceller. När midsommarsolen står som högst, har getterna som mest mjölk och vi ystar på för glatta livet. Sen när soltimmarna minskar, ja då minskar också mjölkmängden och därmed ystningen och energiförbrukningen.
På vintern använder vi bara el till det allra nödvändigaste. Getterna går på sparlåga i väntan på killingarnas ankomst och istället för mjölkning och ystning passar vi på att riva, fixa, rensa och andra projekt som inte hinns med under högsäsongen. Sen till våren när dagarna ljusnar, ja då drar allt igång igen. Hagarna grönskar, mjölken flödar och solen skiner rätt ner i osten!
